Changelog
-
Google’s Gemini 3.5 Flash model is now available through Netlify’s Agent Runners with zero configuration required.
Learn more in the Agent Runners documentation.
-
The Nuxt team has disclosed four security vulnerabilities. Here’s what Netlify customers need to know.
Vulnerabilities
- CVE-2026-47200: Route middleware bypass via island page endpoints (nuxt 3.11.0–3.21.5, 4.0.0-alpha.1–4.4.5)
- CVE-2026-46342: Island response not validated against request props (nuxt 3.1.0–3.21.5, 4.0.0-alpha.1–4.4.5)
- CVE-2026-45670: Dev server exposes built source over LAN (nuxt 3.15.4–3.21.5, 4.0.0-alpha.1–4.4.5)
- CVE-2026-45669: Reflected XSS via
navigateTowithexternal: true(nuxt 3.4.3–3.21.5, 4.0.0-alpha.1–4.4.5)
Impact on Netlify
CVE-2026-47200 (route middleware bypass)
When component islands are enabled — the default in Nuxt 4, and available via an opt-in flag in Nuxt 3 —
.server.vuepage files are accessible via/__nuxt_island/page_*endpoints that render pages without invoking Vue Router, bypassing route middleware entirely. An unauthenticated attacker can request these endpoints directly to access pages that rely solely on middleware for access control.Regardless of hosting provider, all affected Nuxt apps using
.server.vuepages with route-middleware-only authentication are vulnerable.CVE-2026-46342 (island cache poisoning)
The
/__nuxt_island/*endpoint accepts props via query parameters without server-side hash validation, allowing the same path to return different content depending on query parameters. If an upstream cache keys on path only, an attacker can inject crafted props into cached responses — enabling XSS if the application renders those props through unsafe HTML sinks.On Netlify, cached function responses vary by query string. This vulnerability requires overriding Netlify’s default
Netlify-Varybehavior and is not exploitable in standard Netlify deployments.CVE-2026-45670 (dev server source exposure)
Running
nuxt dev --hostbinds the development server to a non-loopback address; with the rspack or webpack builder (not the default Vite builder), malicious sites on the same network can access the application’s source code. This only affects local development environments.Netlify production deployments are not affected. Developers should avoid using
--hostwith rspack or webpack builders, or upgrade to patch the issue.CVE-2026-45669 (reflected XSS via
navigateTo)When
navigateTo()is called withexternal: true, Nuxt generates a server-side HTML meta-refresh redirect. The destination URL is insufficiently sanitized — HTML-significant characters are not encoded, so an attacker who controls the URL parameter can inject arbitrary scripts that execute before the redirect occurs.Regardless of hosting provider, all apps passing untrusted user input to
navigateTo()withexternal: trueare vulnerable.What should I do?
We strongly recommend upgrading as soon as possible to patched releases:
nuxt3.21.6 or later (for Nuxt 3.x), or 4.4.6 or later (for Nuxt 4.x)@nuxt/rspack-builderand@nuxt/webpack-builder3.21.6 or later, or 4.4.6 or later (if applicable)
Note that any publicly available deploy previews and branch deploys may remain vulnerable until they are automatically deleted. Consider deleting these deploys manually.
Resources
-
Google’s Gemini 3.5 Flash model is now available through Netlify’s AI Gateway with zero configuration required.
Use the Google GenAI SDK directly in your Netlify Functions without managing API keys or authentication. The AI Gateway handles everything automatically. Here’s an example using the Gemini 3.5 Flash model:
import { GoogleGenAI } from '@google/genai';export default async () => {const ai = new GoogleGenAI({});const response = await ai.models.generateContent({model: 'gemini-3.5-flash',contents: 'How can AI improve my coding?'});return Response.json(response);};Gemini 3.5 Flash is available for all Function types. You get automatic access to Netlify’s caching, rate limiting, and authentication infrastructure.
Learn more in the AI Gateway documentation.
-
We’re making it easier to use Agent Runners in the existing workflows you have. Now you can do the following in a more seamless way:
- Prompt new changes using Agent Runners more quickly from a GitHub pull request link
- Copy output from Agent Runners faster so you can get back to what you’re doing
- Track pull request ownership so you can understand who is doing what at-a-glance
Start prompting updates from GitHub PR comment link
GitHub-linked sites already receive a comment on each pull request with links to build logs, failure diagnostics, and more. That comment now also includes a Make changes link that opens Agent Runner for the site, with the pull request‘s branch pre-selected in the dropdown.
This makes it faster to act on review feedback or investigate a failing build.
Learn more about Agent Runners.
Copy to clipboard in single click
You can now copy Agent Runner output with a single click.
Previously, grabbing output text — especially long responses or anything on mobile — meant manually selecting it all. A new copy-to-clipboard button now appears alongside Agent Runner output, making it easy to drop results into a doc, a message, or wherever you need them.
Pull requests auto-assign people for clearer ownership
Agent Runner–created pull requests now automatically assign the person who opened them, provided their GitHub account is linked with Netlify.
Before this change, pull requests opened by an agent runner had no assignee, making it harder for teams to track ownership at a glance. Now, when Netlify can match the user to a GitHub account, the pull request is assigned to them automatically.
To take advantage of this, make sure your GitHub account is connected under your Netlify account settings.
-
Team Owners can now guarantee that projects stay within the team to meet compliance or ownership requirements by blocking every project from being transferred to another team.
Once a Team Owner blocks project transfers out of the team, even the Team Owner cannot transfer projects out of the team unless they change this setting, which is tracked in the team’s audit log.
Try it out
To change the setting, go to Team settings > Access & security > Transfer site settings and select Edit settings.
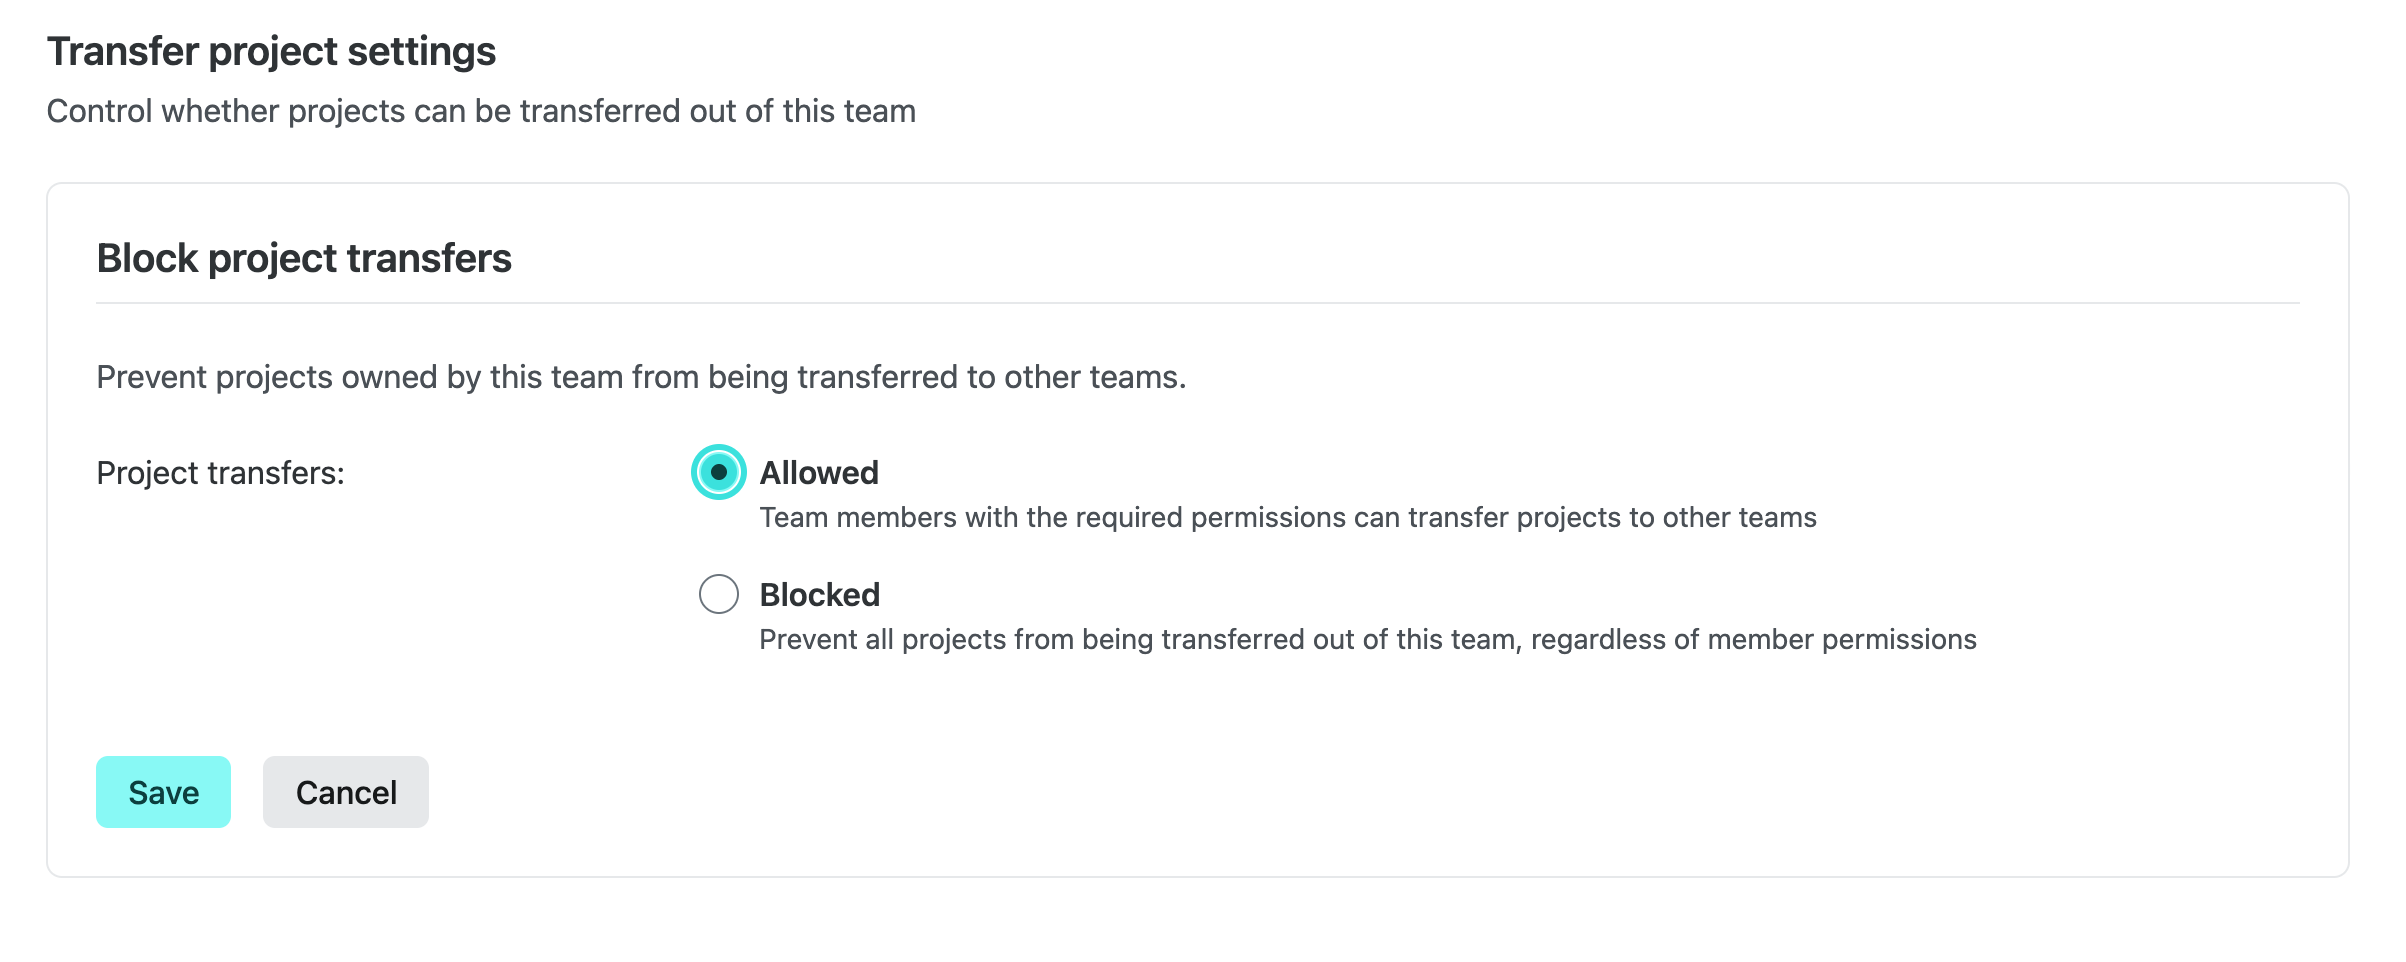
When transfers are blocked, the Transfer project action is hidden for every project owned by the team and the backend rejects transfer requests for those projects.
Enterprise defaults
Enterprise teams start with project transfers set to Blocked for security reasons, but Team Owners can change this setting to Allowed at any time. Only Team Owners can change this setting and changes are recorded in the team audit log.
Learn more
Learn more in our docs on Transferring a project.
-
The Next.js and React teams have disclosed twelve security vulnerabilities: one in React Server Components and eleven in Next.js, all patched on May 6, 2026, plus a follow-up advisory on May 7. The issues span middleware/proxy bypass, cross-site scripting (XSS), server-side request forgery (SSRF), cache poisoning, and denial of service (DoS). No detailed proof-of-concept information has been published. Here’s what Netlify customers need to know.
Summary
If you run Next.js on Netlify, we strongly recommend upgrading
nextto 15.5.18 or 16.2.6 and redeploying. This also brings in the patched React Server Components dependency. Projects using Pages Router with i18n and Next.js Middleware / Proxy also need OpenNext Netlify Next.js adapter v5.15.11. If you usereact-server-dom-*outside of Next.js, upgrade to 19.0.6 / 19.1.7 / 19.2.6 matching your React minor. See What should I do? for full steps.Netlify’s platform is not vulnerable to several of these CVEs. Image Optimization, WebSocket SSRF, RSC cache poisoning, and the cache-poisoned-redirect bypass do not affect Netlify projects. See Impact on Netlify for the per-CVE verdict.
Vulnerabilities
React (
react-server-dom-*)This affects
react-server-dom-webpack,react-server-dom-parcel, andreact-server-dom-turbopack. The Next.js advisory GHSA-8h8q-6873-q5fj tracks the same issue downstream.Vulnerability Severity Affected versions Fixed in GHSA-rv78-f8rc-xrxh — DoS in Server Components (CVE-2026-23870) High 19.0.0–19.0.5, 19.1.0–19.1.6, 19.2.0–19.2.5 19.0.6, 19.1.7, 19.2.6 Next.js
All Next.js issues are patched in 15.5.18 and 16.2.6. Earlier minors of 15.x and 16.x will not be patched; affected projects must upgrade to a patched minor.
Vulnerability Severity Affected versions GHSA-8h8q-6873-q5fj — DoS with Server Components High ≥13.0.0 GHSA-267c-6grr-h53f — Middleware / Proxy bypass in App Router via segment-prefetch routes High ≥15.2.0 GHSA-26hh-7cqf-hhc6 — Follow-up to GHSA-267c-6grr-h53f: incomplete fix for middleware.tswith TurbopackHigh ≥15.2.0 GHSA-mg66-mrh9-m8jx — DoS via connection exhaustion in apps using Cache Components High ≥15.0.0 (apps using Cache Components) GHSA-492v-c6pp-mqqv — Middleware / Proxy bypass through dynamic route parameter injection High ≥15.4.0 GHSA-c4j6-fc7j-m34r — SSRF in applications using WebSocket upgrades High ≥13.4.13 GHSA-36qx-fr4f-26g5 — Middleware / Proxy bypass in Pages Router applications using i18n High ≥12.2.0 GHSA-ffhc-5mcf-pf4q — XSS in App Router applications using CSP nonces Medium ≥13.4.0 GHSA-gx5p-jg67-6x7h — XSS in beforeInteractivescripts with untrusted inputMedium ≥13.0.0 GHSA-h64f-5h5j-jqjh — DoS in the Image Optimization API Medium ≥10.0.0 GHSA-wfc6-r584-vfw7 — Cache poisoning in React Server Component responses Medium ≥14.2.0 GHSA-vfv6-92ff-j949 — Cache poisoning via collisions in React Server Component cache-busting Low ≥13.4.6 GHSA-3g8h-86w9-wvmq — Middleware / Proxy redirects can be cache-poisoned Low ≥12.2.0 Impact on Netlify
Denial of service
GHSA-8h8q-6873-q5fj and GHSA-mg66-mrh9-m8jx are server-side denial-of-service (DoS) vulnerabilities. On Netlify, these have minimal impact: our autoscaling serverless architecture means that a malicious request resulting in a crashed or hung function does not affect other requests. However, active exploitation could increase your function costs. Note that Cache Components (GHSA-mg66-mrh9-m8jx) is an opt-in Next.js feature that is not enabled by default. Upgrading Next.js resolves both.
GHSA-h64f-5h5j-jqjh affects the Next.js Image Optimization API. Netlify projects are not affected: this Next.js code path is not used on Netlify — image optimization is handled by Netlify Image CDN, a separate service that runs outside your project’s functions with its own protections against this class of issue.
Middleware / proxy bypass
These four CVEs affect Next.js middleware and proxy routing. Because Netlify runs Next.js middleware via our own edge function adapter, the impact varies per CVE:
- GHSA-3g8h-86w9-wvmq (cache-poisoned redirects): Netlify projects are not affected. Our OpenNext Netlify Next.js adapter already varies cached responses on the
x-nextjs-dataheader. - GHSA-492v-c6pp-mqqv (dynamic route parameter injection): Netlify projects are affected, and the upstream Next.js fix applies. Upgrading Next.js resolves the issue.
- GHSA-36qx-fr4f-26g5 (Pages Router i18n bypass): Netlify projects using Pages Router with i18n and Next.js Middleware / Proxy are affected. The upstream Next.js patch alone does not resolve this on Netlify; a Netlify-specific fix shipped in OpenNext Netlify Next.js adapter v5.15.11. See how to upgrade below.
- GHSA-267c-6grr-h53f (App Router segment-prefetch bypass) and GHSA-26hh-7cqf-hhc6 (follow-up): Netlify projects are affected, and the upstream Next.js fix applies. Upgrading Next.js resolves both.
Cross-site scripting
GHSA-ffhc-5mcf-pf4q and GHSA-gx5p-jg67-6x7h are client-side XSS vulnerabilities. Regardless of hosting provider, all apps using CSP nonces in App Router or passing untrusted input to
beforeInteractivescripts may be vulnerable. Upgrade Next.js to remediate.Server-side request forgery
GHSA-c4j6-fc7j-m34r affects applications using WebSocket upgrades. Netlify projects are not affected: Netlify Functions and Edge Functions do not support WebSocket upgrades, so this Next.js code path cannot be exercised on Netlify.
Cache poisoning
GHSA-wfc6-r584-vfw7 and GHSA-vfv6-92ff-j949 affect React Server Component response caching. Netlify projects are not affected: Netlify’s CDN does not rely on the
_rsccache-busting query parameter (so collisions in it cannot poison cache entries), and it honorsVaryon RSC-related request headers.What should I do?
We strongly recommend upgrading as soon as possible to patched releases:
- Next.js projects: upgrade
nextto 15.5.18 or 16.2.6. This bundles the patched React Server Components dependency, so a separatereact-server-dom-*upgrade is not needed. - Direct
react-server-dom-*users (React Router RSC, Vite RSC plugin, custom RSC setups): upgradereact-server-dom-webpack,react-server-dom-parcel, orreact-server-dom-turbopackto 19.0.6, 19.1.7, or 19.2.6 — matching your React minor.
For Next.js 13.x and 14.x users: patches are not planned for these versions. Consider upgrading to Next.js 15.x or 16.x.
For projects using Pages Router with i18n and Next.js Middleware / Proxy (GHSA-36qx-fr4f-26g5), the upstream Next.js fix does not fully apply on Netlify. The fix ships in OpenNext Netlify Next.js adapter v5.15.11:
- Auto-installed adapter (default): redeploy.
- Manually installed adapter: upgrade
@netlify/plugin-nextjsto v5.15.11 and redeploy. We recommend not pinning the adapter version so future fixes ship automatically.
Note that any publicly available deploy previews and branch deploys may remain vulnerable until they are automatically deleted. Consider deleting these deploys manually.
Resources
- GHSA-3g8h-86w9-wvmq (cache-poisoned redirects): Netlify projects are not affected. Our OpenNext Netlify Next.js adapter already varies cached responses on the
-
Google’s Gemini 3.1 Flash-Lite model is now available through Netlify’s AI Gateway with zero configuration required. The Preview version of this model was available as of March 3, 2026.
Use the Google GenAI SDK directly in your Netlify Functions without managing API keys or authentication. The AI Gateway handles everything automatically. Here’s an example using the Gemini 3.1 Flash-Lite model:
import { GoogleGenAI } from '@google/genai';export default async () => {const ai = new GoogleGenAI({});const response = await ai.models.generateContent({model: 'gemini-3.1-flash-lite',contents: 'How can AI improve my coding?'});return Response.json(response);};Gemini 3.1 Flash-Lite is available for all Function types. You get automatic access to Netlify’s caching, rate limiting, and authentication infrastructure.
Learn more in the AI Gateway documentation.
-
OpenAI’s GPT-5.5 Instant model is now available through Netlify’s AI Gateway with zero configuration required.
Use the OpenAI SDK directly in your Netlify Functions without managing API keys or authentication. The AI Gateway handles everything automatically. Here’s an example using the GPT-5.5 Instant model:
import OpenAI from 'openai';export default async () => {const openai = new OpenAI();const response = await openai.responses.create({model: 'chat-latest',input: 'How does AI work?'});return Response.json(response);};Note: The model API name is
chat-latest.GPT-5.5 Instant is available for all Function types. You get automatic access to Netlify’s caching, rate limiting, and authentication infrastructure.
Learn more in the AI Gateway documentation.
-
@netlify/identity1.1.0 introduces a newverifyRequestOriginhelper to make it easier for developers and AI agents to add CSRF (Cross-Site Request Forgery) protection when running authentication on the server.You can call
login(),signup(), orlogout()from a Netlify Function or Edge Function to handle authentication entirely on the server. The library reads and writes thenf_jwtandnf_refreshcookies through the Netlify runtime, so the user’s browser receives the session via the response.netlify/functions/login.ts import { login, verifyRequestOrigin } from '@netlify/identity'import type { Context } from '@netlify/functions'export default async (req: Request, context: Context) => {verifyRequestOrigin(req)const { email, password } = await req.json()await login(email, password)return new Response(null, { status: 302, headers: { Location: '/dashboard' } })}When
login(),signup(), orlogout()runs inside an HTTP endpoint that you expose, that endpoint needs Cross-Site Request Forgery (CSRF) protection. Without it, an attacker can trick a victim’s browser into logging into the attacker’s account, then collect anything the victim does inside that session.Call
verifyRequestOrigin(request)at the start of the handler. It compares the request’sOriginheader against the request’s own origin and throws a 403 on mismatch. If your framework already checksOriginon state-changing requests by default, the call is redundant but harmless.Refer to the
@netlify/identityCSRF protection documentation for the full threat model and theallowedOriginsoption.