We’re so excited to give you the opportunity to customize, automate, and have more control of your build process. How are we doing that? With Build Plugins of course! Netlify Build Plugins are, simply put, plain ‘ol JavaScript files that let you trigger actions at different events of your build cycle. The best way I learned about the power behind Build Plugins was to use them, build them, and learn about the other plugins built by my team and other devs in the community. So, obviously, I wanted to share all of that with you too!
In this three-part series we’re going to cover everything you need to know to power up your builds with Netlify Build Plugins!:
- Part 1: Using Build Plugins (you are here) We’ll dig into the process of enabling Build Plugins through the UI. Then we can take a look at how to incorporate them into our project both locally and in production builds. To round it out, we’ll also look into how to disable Build Plugins and remove them from our projects.
- Part 2: Making Build Plugins This post will walk through how to make a Build Plugin and touch on each build event we can utilize. The build plugin we make will be the one we use here in Part I (so meta, I know). This plugin will showcase other features like using inputs, handling errors, pulling in project constants, and more.
- Part 3: Sharing Build Plugins As I mentioned before, it helped me to see what awesome Build Plugins other developers were making. So, for this post not only will we point to other Build Plugins in the ecosystem but we’ll also see how to share the Build Plugin we create in Part 2. Sharing is caring after all.
I hope you come along for the ride, but for now, I’m glad you’re here with me on our current journey of using Build Plugins. Here’s a breakdown of what we’ll cover in this post:
- Enabling your project to use Build Plugin
- Adding a Build Plugin to you project
- Running a Build Plugin locally
- Removing & disabling Build Plugins
Excited? Yea, me too. Ok, let’s get started.
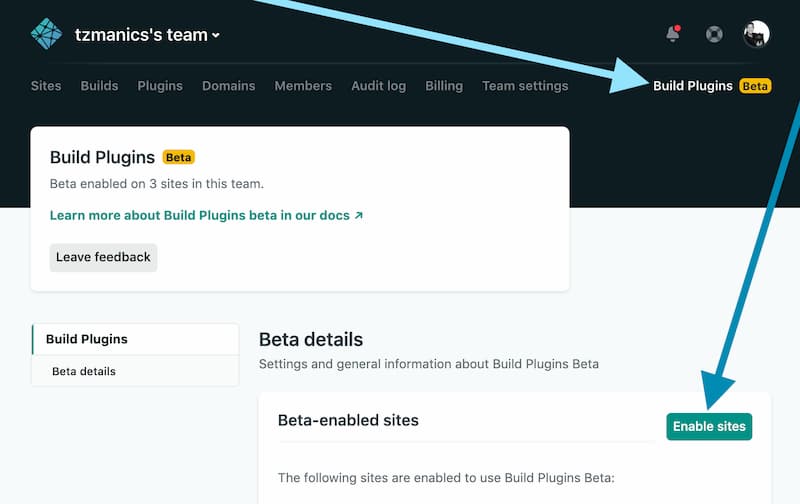
How to Enable Netlify Build Plugins
Let’s get things started with an easy win: enabling Build Plugins for a project. At the top of the team or project page there is a ‘Build Plugins Beta’ button. Click that to head to the Build Plugins page. Here we can find a button that says ‘Enable sites’, pick from our project list and select one or multiple sites. Then click the ‘Enable’ button and they will show up on our list of ‘Beta-enabled sites’.
🔌 Adding a Build Plugin
Now that we have our site enabled we can start adding the magic, um, I mean Build Plugins. We do this through the project’s netlify.toml configuration file. We add a configuration of [[plugins]], nested underneath we assign package to the plugin name. Since it’s an npm module (and we’re not running it locally) we’ll just add the name as we would do when installing via a package manager. To clarify a bit more, Build Plugins will be published to npm so that they can be installed and used in our projects. You can also include plugins by creating or installing them locally and referencing them via package with a relative path to the plugin. Here we’re using a published Build Plugin.
[[plugins]]package = "netlify-plugin-to-all-events"💭If you want to add multiple Build Plugins you will want to have these two lines for each plugin. Here is more information in our docs.
Plugins have the ability to take in input, especially when it pertains to user preferences. To pass information to a plugin, we can add this with inputs in the same file, netlify.toml. These inputs are called with [plugins.inputs] and get added underneath the plugins we listed. For each plugin we’ll have the [[plugin]] declaration, followed by package telling where to find it, then its list of inputs needed under [plugins.inputs].
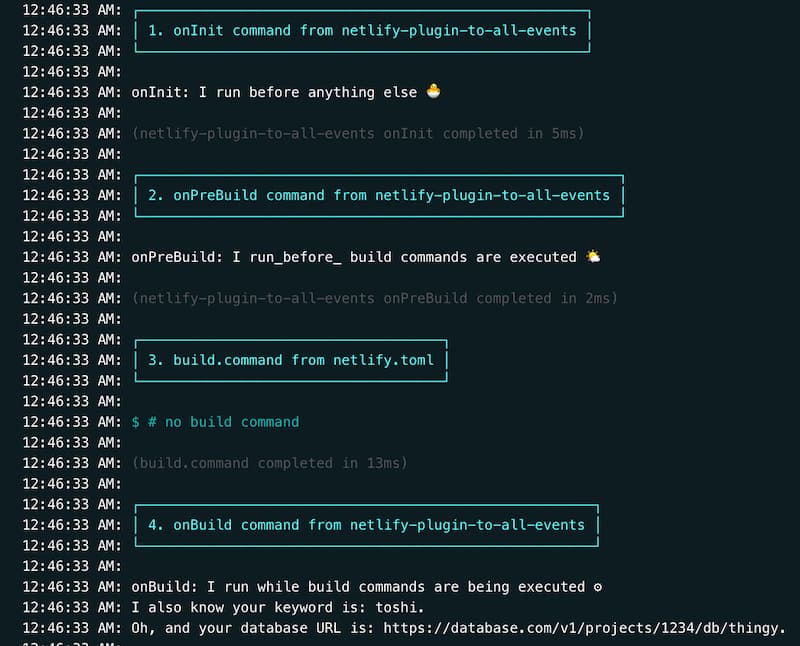
[[plugins]]package = "netlify-plugin-to-all-events" [plugins.inputs] keyword = "toshi" databaseUrl = "https://database.com/v1/projects/1234/db/thingy" trigerAll = true[[plugins]]package = "../path/to/local/plugin" [plugins.inputs] thisPluginsInputs = "go here"Most Build Plugins should have the required inputs listed in the README.md or documentation of their plugin. If needed, we can also check the Build Plugin’s manifest.yml configuration file. This will list the inputs, their name, a description, if they are required, and may even have a default value listed. It will look like this:
name: netlify-plugin-to-all-eventsinputs: - name: keyword description: Describe what keyword to look for default: toshi - name: databaseUrl description: The URL of the database, duh required: true - name: triggerAll description: Boolean to decided whether to run all the event code default: true required: true📖 You can learn more about the
manifest.ymlfile in Part 2 of this series or in the repo for Netlify build.
This is what our full netlify.toml file might look like now if we already had our build command and project directory listed.
[build] command = "npm run build" publish = "dist"[[plugins]]package = "netlify-plugin-to-all-events" [plugins.inputs] keyword = "toshi" databaseUrl = "https://database.com/v1/projects/1234/db/thingy" trigerAll = trueWith that, we have all the code to let Netlify know that we are incorporating a build plugin into our project. If we were to trigger a build with this added to our project this is what our logs would look like:
How to Run a Build Plugin Locally
Whenever we deploy and have Netlify build a project via Git push trigger, deploying with a ‘Deploy to Netlify’ button, through the CLI, or whatever nifty way you’ve set deploys up, the code above is all we need. We can also build locally to see the steps Netlify takes in building our app and how the Build Plugins interact with those events.
Local Plugin Path
First, we need to change the plugins package setting to point to a relative path where the Build Plugin lives (the folder that holds the index.js and manifest.yml of the plugin). In this case, we’ll keep the sample project that will use the Build Plugin in the same directory as the Build Plugin for less typing 😋.
The file structure:
+ PLUGIN_WORK + sample-project - index.html + netlify-plugin-to-all-events - manifest.yml - index.js - package.jsonThe changes to netlify.toml:
[[plugins]]package = "../netlify-plugin-to-all-events"👆That’s the only line that changes. The rest stays the same.
Local Build Commands
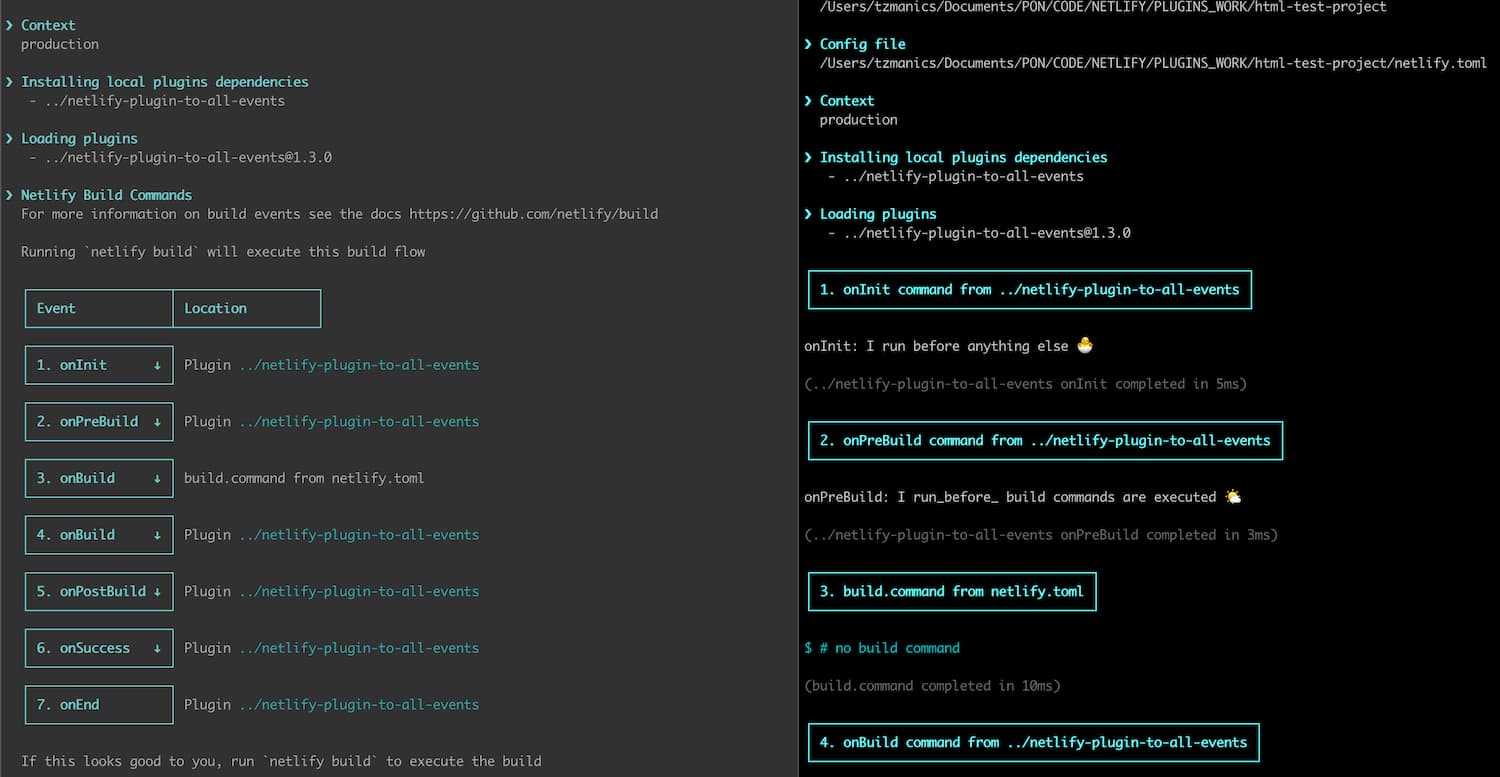
Using the Netlify CLI we can get a preview of the build process. There are two ways of doing this:
netlify build --dry: show you a summary of what the build will do at each stage without running a full buildnetlify build: will execute a build locally and output all the logs
Here’s a side-by-side snippet of the logs:
We are all setup to run Build Plugins locally.
How to Disable Build Plugins
If we decide we don’t want to use the Build Plugins we added we just need to do all these steps in reverse 😋. First, we’ll want to remove the plugin and its inputs from our netlify.toml file. This means removing the all the [[plugins]] lines and the [plugins.inputs]. Basically, if it has anything to do with a plugin you don’t want to use anymore, save yourself the technical debt and delete it now.
Only one more step to go: disabling plugins for your project via the UI. If we go back to the ‘Build Plugins Bets’ page, the link will be in the header at the top of the Team or Project page. We can see the list of project that we enabled Build Plugins for. Each project will also have an ‘Options’ drop down menu. In that menu we have the option to click ‘Disable Build Plugins Beta’. Currently, we have a follow-up, one question survey after you disable. Since, Build Plugins are in beta, it really helps us to hear any feedback!
Here is a little video walking you through the disable process:
Building a Better Build Plugin Future
We are prepped and ready to start utilizing Build Plugins in our projects. We also have the power to create Build Plugins to do what we want and help fellow devs too! Doesn’t that sound all altruistic and lovely? If you think so, you’re going to love the next post in this series where we will create the Build Plugin we used here. Thanks for joining me, I hope you have a blast with Build Plugins. Happy coding 👩🏻💻!
To be notified of the next post in this series and to stay up to date on future posts, be sure to sign up for our newsletter!